分類: Uncategorized

  • 如何移除 Parallels 中已建立的虛擬機器

    http://kb.parallels.com/en/5029

    How to uninstall/delete a Virtual Machine in Parallels Desktop for Mac

    Article ID: 5029

    Created On: Apr 15, 2008

    Last Review: Sep 6, 2013

    Views:

    APPLIES TO:

    • Parallels Desktop 9 for Mac
    • Parallels Desktop 8 for Mac

    Resolution

    To delete/uninstall your virtual machine (VM):

    1. Launch Parallels Desktop, but do not start your virtual machine;
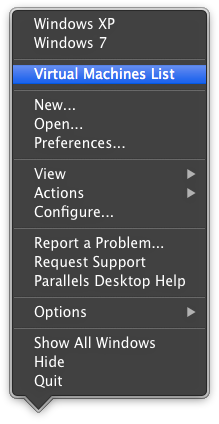
    2. Open virtual machines list by right-clicking the application icon in the Dock -> Virtual Machines List

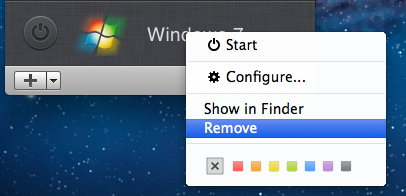
    3. Right-click on your VM in the list;
    4. Choose Remove in the menu.

    5. Or open the Virtual Machine window, in the Parallels Desktop menu choose File -> Remove.

    6. You can Keep files in case you wish to have access to files saved on this virtual machine. Choose Move to Trash if you do not need any data located in this Virtual Machine and want to remove it completely.

    (IMPORTANT: This operation is IRREVERSIBLE. The Virtual Machine will be deleted, and there is no way to restore it.)

    NOTE: If you do not have Parallels Desktop for Mac installed on your Mac, search for .pvm file in either /Users/username/Documents/Parallels/ or /Users/Shared/Parallels/ and move it to Trash. You may use Spotlight to find the virtual machine. Type “.pvm” in the Spotlight search bar to locate the Parallels Virtual Machine on your Mac.

  • PGP 產品新舊品名對照 & PGP 產品與內容物

    【PGP 產品新舊品名對照】

    http://www.symantec.com/business/support/index?page=content&id=TECH197084

    clip_image001[4]

    clip_image002[6]

    clip_image003[4]


    【PGP 產品與內容物】


    依據您所購買與輸入的 License key,此畫面會 [勾選] 出相對應的產品 ( 此畫面為 PGP Desktop Enterprise 或稱 PGP Desktop Corporate  )

    clip_image014[4]

    以下是 PGP Desktop 的產品組合與內容物


    • PGP Desktop Email = PGP Messaging
    • PGP 套裝產品均含 (PGP Whole Disk、PGP Virtual Disk、PGP Zip)
    • PGP Portable 已停產 ( 由 SEE RSE 取代 ),但 PGP Universal Server 主控台中仍可啟用 PGP Portable

    clip_image015[4]

    PGP 還可以進行的操作

    image

  • 如何更改 Symantec 合約聯絡人

    如果要更改合約聯絡人,請進行以下步驟:

    1. 下載並填寫異動申請表

    2. 信件書寫範例

    主旨:Please help to change the license contract contact
    內容:Please check the attachement and change the license contract contact.

    3.請使用同單位 (必須要是一樣的 mail domain) 的信箱,將此信件及附件寄至 Data_Management-APAC@symantec.com


    ※ 異動申請表請填寫紅色欄位

    image

  • 如何要求重發【Symantec 版本升級通知】

    可以撥打 【02-8761-5800 #4 (企業業務問題諮詢) #1  (非技術問題)】

    告訴客服人員沒有收到升級通知信件,客服會要求提供產品序號 Mxxxxxxxxxx

    然後會將升級通知信件再次發給原合約聯絡人,並詢問還要額外發給誰 (必須要是一樣的 mail domain)

  • 關於SEE RSE 【限制使用者安裝或使用 SEE client】& 【加密密碼更新】

    關於SEE RSE 【限制使用者安裝或使用 SEE client】& 【加密密碼更新】

    1. SEE RSE 【限制使用者安裝或使用 SEE client】

    SEE RSE 安裝會需要重開機,重開機後會要求註冊

    如果勾選註冊時需要密碼驗證,那麼撿到此 SEE client 安裝程式的人,即使安裝了 SEE client 也無法使用(此註冊密碼可以在主控台管控)

    clip_image002

    也可以透過以下管理員帳戶來反註冊,或設定多久時間沒有登入就自動反註冊

    clip_image004

    2. 【加密密碼更新】

    (1) 加密可以採用密碼加密,或是憑證加密

    clip_image006

    (2) default password

    如果用戶端沒有設定 default password,則每次將檔案拖曳至隨身碟時,會跳出密碼視窗,請於此輸入加密密碼

    如果用戶端 有設定 default password,則每次將檔案拖曳至隨身碟時,會直接使用此default password 來對檔案進行加密

    先前對檔案加密時所使用的密碼(default password 或自行輸入的密碼)如需更改,僅能透過手動方式修改

    不過,如果是透過 default password 加密的使用者,修改則相對簡單,只需要將隨身碟中的檔案拖曳回個人電腦 ( 自動解密 ),再拖曳回隨身碟 ( 就會自動以新的 default password 加密 )

    clip_image008

    (3) Workgroup Key

    Workgroup Key 也是屬於密碼加密,舊的 Workgroup Key 若要異動,也需要重新加密

    clip_image010

    3. 以下是隨身碟插入有安裝 SEE Client 後的狀況

    隨身碟圖示更改

    clip_image012

    自動複製 Access Utility

    未安裝 SEE Client 的用戶端看到加密檔案是以 .XML 格式呈現

    clip_image014

    直接開啟會顯示亂碼

    clip_image016

    必須執行 Access Utility 來開啟加密檔案,Access Utility 視窗中加密檔案呈現紅色鎖頭

    clip_image018

    嘗試開啟會求輸入解密密碼

    預設有4次錯誤密碼的容許次數,超次後會暫停1分鐘 (可設定),5分鐘後會再 reset 成4次錯誤密碼的容許次數

    clip_image020

    clip_image022

  • PGP Universal integrated with AD

    PGP Universal integrated with AD


    請先 Enable Directory Synchronization

    clip_image002

    按下左下方【Settings】

    image

    勾選【Enroll clients using directory authentication】來整合 AD 驗證

    image

    按下【Add LDAP Directory】

    image

    name:給予一個 LDAP 識別名稱 (例如:elite2003.intra)

    Type:如果是 AD 就選 (Active Directory)

    LDAP Credentialsl: 輸入 AD 使用者名稱與帳號密碼

    [Bind DN]:請輸入AD帳戶,格式範例 (CN=Administrator,CN=Users,DC=elite2003,DC=intra)

    [Passphrase]:請輸入AD帳戶的密碼

    Hostname:輸入 AD 主機名稱或 IP (2003.elite2003.intra)

    port :(389)

    Protocol: (LDAP)

    然後按下【Test Connection】確認連線正常

    clip_image004

    按下【Browse Base DNs】來定義 Base DN 搜尋範圍

    image

    按下【View Sample Records】來確認有撈到使用者

    clip_image008

    有撈到使用者

    clip_image010

    在 Group Setting 中定義 Group Membership

    例如:

    Attribute:(memberOf)

    Value:( CN=pgp_group,OU=PGP_OU,DC=elite2003,DC=intra)

    clip_image012

    勾選【Enable Silent Enrollment】

    image

    允許 Single Sign-On

    clip_image014

    之後就可以下載用戶端安裝程式來安裝

    image

  • Upgrade to SEE 8.2.1 MP7

    Upgrade to SEE 8.2.1 MP7

    Upgrade Management Server

    clip_image001

    clip_image002

    clip_image003

    clip_image004

    clip_image005

    clip_image007

    clip_image009

    clip_image011

    clip_image012

    Upgrade SEE Manager

    1.MSIEXEC /i “[path]\Symantec Endpoint Encryption Framework[ x64].msi” REINSTALL=”ALL” REINSTALLMODE=”vomus”

    MSIEXEC /i “D:\Symantec_Endpoint_Encryption_8.2.1_MP7_Removable_Storage_EN\ Symantec Endpoint Encryption Framework x64.msi” REINSTALL=”ALL” REINSTALLMODE=”vomus”

    clip_image013

    clip_image014

    clip_image015

    clip_image016

    clip_image017

    2.MSIEXEC /i “[path]\Symantec Endpoint Encryption Full Disk Edition[ x64].msi” REINSTALL=”ALL” REINSTALLMODE=”vomus”

    MSIEXEC /i ” D:\Symantec_Endpoint_Encryption_8.2.1_MP7_Full_Disk_EN\SEE-FD\Server Installers\ Symantec Endpoint Encryption Full Disk Edition x64.msi” REINSTALL=”ALL” REINSTALLMODE=”vomus”

    3.MSIEXEC /i “[path]\Symantec Endpoint Encryption Removable Storage[ x64].msi” REINSTALL=”ALL” REINSTALLMODE=”vomus”

    MSIEXEC /i “D:\Symantec_Endpoint_Encryption_8.2.1_MP7_Removable_Storage_EN\ Symantec Endpoint Encryption Removable Storage x64.msi” REINSTALL=”ALL” REINSTALLMODE=”vomus”

    clip_image019

    Upgrade Windows Client

    同上

    clip_image020

  • SEE Removable Storage Edition 用戶端登入

    SEE Removable Storage Edition 用戶端登入

    123

    clip_image001

    clip_image003

    未來Full Disk 忘記密碼時,可以透過以下問答的驗證來允許登入

    clip_image004

    clip_image005

    clip_image006

    clip_image007

    clip_image009

    clip_image010

    SEE Administrator Client

    用 Client Administrator 登入後,可以取消註冊到 SEE 的用戶端

    clip_image011

    clip_image012

    clip_image014

    clip_image016

    clip_image018

    插入的 USB 是屬於例外的裝置,新增的檔案不會被加密

    clip_image019

    SEERemovableStorageAccessUtility (Windows & Mac) 會自動 copy 至 USB 中

    clip_image020

    clip_image021

    clip_image022

    clip_image023

    clip_image024

  • SEE Help Desk 安裝

    SEE Help Desk

    clip_image001

    clip_image003

    clip_image005

    clip_image006

    clip_image007

    [Client]

    clip_image009

    clip_image010

    clip_image011

    [Client]

    clip_image012

    [Client]

    clip_image013

    [Client]

    clip_image014

    [Client]

    clip_image015

    clip_image016

    clip_image017

    clip_image018

  • 4_SEE RSE Policy

    4_SEE RSE Policy

    Native policies

    • 只能套用至 computer (套用順序:computer、Sub group、Group)
    • Native policies are designed for deployment to computers that are not managed by Active Directory.

    SEE Roles

    • Policy Administrators
    • Client Administrators
    • Policy Create

    SEE 有此兩類 Policy

    • 【Active Directory Policy】
    • 【Native Policy】

    【Active Directory Policy】的畫面

    clip_image002

    展開【Machine Policy】→【Framework】→來進行以下相關項目的設定

    【Client Administrator】

    The password must be a minimum of two characters and no longer than 32

    Token->P7B file

    ※ Client Admin 的驗證方式與管理權限 RSE → (用來 Unregister user),FD → (用來 Decrypt drivers、Extend lockout、Unlock)

    ※ Level →8.0.0 之後用不到

    clip_image004

    【Registered Users】

    clip_image006

    clip_image008

    【Password Authentication】

    clip_image010

    clip_image012

    【Token Authentication】

    允許過期憑證驗證

    clip_image013

    【Authentication Message】

    驗證遇到問題時,可依訊息所指定的方式聯繫資訊人員協助處理

    clip_image014

    【Communication】

    用戶端電腦每隔多久傳送狀態更新給 SEE Management Server

    clip_image015

    展開【User Policy】→【Framework】→來進行以下相關項目的設定

    【Single Sign-on】

    clip_image016

    clip_image017

    【Authenti-Check】

    clip_image018

    【One-Time Password】

    Full Disk 使用者忘記密碼時使用

    clip_image019

    展開【Machine Policy】→【Removable Storage】→來進行以下 【Removable Storage】 相關項目的設定

    clip_image020

    【Access and Encryption】

    clip_image021

    【Device and File Type Exclusions】

    clip_image022

    【Encryption Method】

    clip_image023

    【Default Password】

    Session Default Password

    可以設定兩個 Session Default Password

    Device Session Default Password

    clip_image025

    clip_image027

    【Recovery Certificate】

    clip_image028

    clip_image029

    clip_image030

    http://www.symantec.com/connect/forums/password-recovery-encrypted-files

    If you have a master certificate, you may.

    1. Launch MMC, add Certificates snap-in for my user account.
    2. Expand Certificates – Current User under Console Root in the left pane, right click Personal folder, then go to All tasks -> click Request new certificate…
    3. Select User as certificate type, click Next.
    4. Give it a friendly name, click Next.
    5. Verify the details at the last screen and click Finish.
    6. By default, Windows 2003 enterprise root CA is configured to automatically generate a user certificate upon receiving a request. So now, you should see a Certificates folder under Personal folder in the left pane.
    8. Click the Certificates folder, in the right pane, you should see the user certificate that’s just generated.
    9. Right click the user certificate, go to All tasks -> click on Export….
    10. Select No, do not export the private key and click Next.
    11. Select Cryptographic Message Syntax Standard – PKCS #7 Certificates (..P7B), then next.
    12. Give it a name, and click Finish.

    Now create the Removable storage client package. In the Removable Storage Installation Settings –Encryption Method, select A password or A password and/or one or more certificates.

    In the Removable Storage Installation Settings –Recovery Certificate, choose Encrypt files with a recovery certificate and browse and select the saved P7B certificate.

    In the Removable Storage Installation Settings – Portability pane check Copy the Removable Storage Access Utility to all removable storage devices.

    【Workgroup Key】

    clip_image031

    【Portability】

    clip_image032

    展開【Machine Policy】→【Full Disk】→來進行以下 【Full Disk】 相關項目的設定

    【Startup】

    clip_image033

    【Logon History】

    clip_image034

    【Autologon】client 收到 policy 後要5分鐘才生效

    clip_image036

    clip_image037

    【Remote Decryption】

    clip_image038

    【Client Monitor】

    clip_image040

    clip_image015[1]

    【Local Decryption】

    clip_image041